Last week I was working on a new application which required me to build a web service to access it’s functionality. I decided to check out Spring 4 RestController.
I was amazed at how far we have come from writing all the boiler template code, xmls etc for making a restful call. With Spring4 boot, it was matter of adding simple annotation for RestController.
I will be honest, I have not been up to date on how to use a Restful webservice, I built a couple of Restful service a couple of year ago, but most of the services in my current project are old school (SOAP calls), so I never got a chance to build one from scratch and at peace.
Prerequisites: Read Carefully
-
Spring 4 requires you to use Maven 3 in fact it will force you to use Maven 3. This is very important point because it took me an hour to figure this out. If you try to use Maven 2, it will build and “might” compile but the code will complain that some of the RestController class methods are not found. This happens because by default, maven 2 will pull in Spring 2.5.x jar files.
-
Requires a minimum of JDK 6.
What are we building?
We will build a service that will accept HTTP GET request at: http://localhost:9000/welcome
and respond with a JSON message:
{"content":"Hello Dinesh"}
Step 1: Create a maven project using command line tools or your favorite IDE.
Step 2: In the pom.xml add the following information
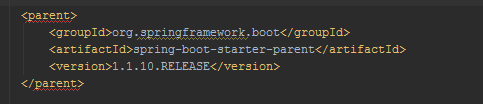
a) Parent:
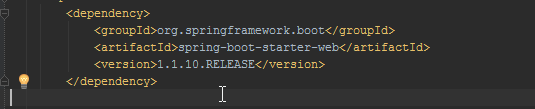
b) Add spring-boot dependency
c) Add spring-boot plugin

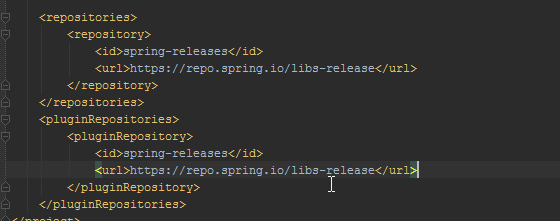
d) Add spring repositories
Why do we need Spring Boot Maven Plugin?
You might be wondering what happened to the good old maven build plugin. Well that plugin still works and will compile and build your project, but Spring-boot-maven-plugin searches for the public static void main() method to mark it as runnable class if you use the command “mvn:run”. Secondly, it comes with its own dependency resolver for the version number to match the Spring-boot-starter-web dependencies.
Step 3: Create JSON Message POJO class
src/main/java/dinesh/Welcome.java
|
|
Note: Spring 4 Boot automatically uses Jackson JSON library to marshal instances of Welcome into JSONObjects.
Step 4: Create a resource Controller
All Spring HTTP requests are handled by Spring controllers. For Restful services Spring 4 comes with a new annotation @RestController annotation. This will handle the requests which are posted to url /welcome by returning a new instance of Welcome class.
src/main/java/dinesh/WelcomeController.java
|
|
If you look closely, you will know why I said Maven 2 will not work. Maven 2 will pull in RequestParm class from old Springmvc jar file which does not have method defined for defaultValue(). It is going cry out loud during compilation.
@RestController – annotation marks the class as controller where every method returns a domain object instead of a view, which is major distinction between @Controller and @RestController which is a short hand for @Controller + @ResponseBody
The @RequestMapping annotation helps Spring to identify what method to invoke when some one accesses “/welcome” url.
The @RequestParam binds the value of parameter “name” into the name parameter of the welcome() method. If you do not pass any value in the query string then the default value is “world” – default value=”World”. If you do not add default value and forget to pass a “name=xx” in the query string, you will hear a loud cracking, lots of smokes, some curses and code will complain of NP exceptions :-).
One important thing that you notice is that we have not done anything to marshall request/response as JSONobject. The old of way of doing this would need you to use Jackson libraries and a lot of annotation to make them as JSON properties. Thanks to Spring 4, it takes of it using Jackson dependencies in the background.
Step 5: Create an executable “jar” file. yes you read it right. Although you can create a war file, for smaller project like the one I build and the one for this example, I am not going to go through those steps. you cn check the Spring documentation on this topic. Just a high level view what is required is that you get right of the boot plugin, change the packaging tag in the pom.xml to war.Here’s a good post
src/main/java/dinesh/Execute.java
|
|
@ComponentScan tells the app to check for @component annotation and it makes sure that Spring finds and registers WelcomeController, because it is marked as “@RestController” .
Step 6: Build and run
Method 1 :
Run ‘mvn clean install’ in the command line
After the jaris built, run
java -jar target/xxx.jar
Method 2:
Run spring-boot:run
Spring 4 comes with built-in Tomcat 7, so you do not need a full-blown JEE application server to deploy and run your web service. Either of the method will fire up the application on port 8080.
How do I change port number?
just run
spring-boot:run -Dserver.port=9000
Step 7: Test your service
Once the service is up, visit http://localhost:8080/welcome?name=your-name and you will get back a response
|
|
~Ciao